[toc]
IoC是Spring的核心,那么AOP就是Spring最为重要的功能之一。在数据库事务中,切面编程被广泛使用。
1. Spring AOP基本概念
在动态代理基础上,在代理类(实现bind,invoke方法的类)中,加入拦截器作为属性,bind方法中获取拦截器保存在属性中,invoke方法中执行拦截器的方法。
1.1 AOP概念和意义
尤其在数据库事务中,OOP不能完全解决问题。如交易系统和财务系统,购物过程中这两个系统应形成统一的事务管理。事务管理就需要用到面向切面的编程,切面环境就是数据库事务。
AOP的一些意义:拦截一些方法、把对象组织成一个整体、约定动态流程完成各阶段的自定义操作等。
减少代码冗余:JDBC或MyBatis中,都需要try-catch-finally,手动获取连接/映射器,进行各种异常判断。而在AOP中,只需加入一个注解,代码就可抛开try-catch-finally,专注于业务逻辑,更简洁,更易维护。
实现原理:正常的SQL步骤是完成连接、执行SQL,若成功则提交、失败则回滚。这个过程可以放在拦截器中,与被代理对象一并执行。即,可以将SQL流程封装,通过动态代理技术,设计为:建立连接放在拦截器的before方法、执行SQL则是被代理对象的方法、回滚与提交则通过是否发生异常来判断决定,同样放在拦截器中、关闭连接等数据库资源同样拦截器中实现。
AOP的封装:上述的拦截器内置在AOP中,建立连接、判断回滚与提交、关闭连接等都由AOP自行完成,用户只需编写SQL完成业务逻辑、标注@Transactional表示启用数据库事务即可。当然也提供一些配置能力。
1.2 AOP术语
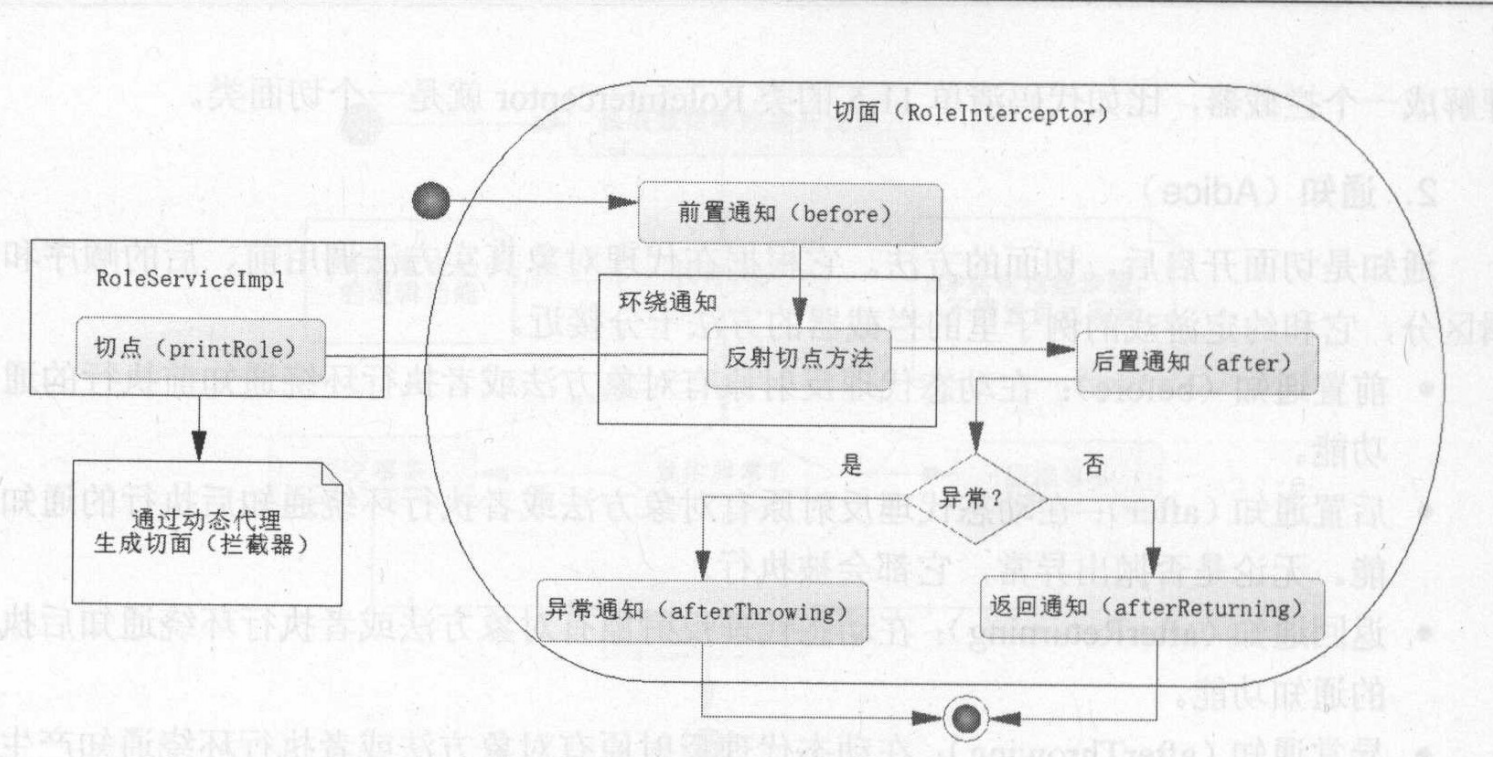
- 切面 Aspect:在一个怎么样的环境中工作。如上述的简单数据库事务操作,事务贯穿整个代码层面,故事务就是一个切面,能在被代理对象的方法前后、异常或正常返回后切入自定义代码,甚至代替原本被代理对象的方法。动态代理中可以理解为拦截器。
- 通知 Adice:切面开启后,切面的方法。类似拦截器的方法。
- 前置通知 before:在动态代理反射被代理对象方法前,或执行环绕通知前执行的通知功能
- 后置通知 after:在动态代理反射被代理对象方法后,或执行环绕通知后执行的通知功能,且无论是否抛出异常,都会执行
- 返回通知 afterReturning:在动态代理反射被代理对象方法后,或执行环绕通知后执行的通知功能
- 异常通知 afterThrowing:在动态代理反射被代理对象方法,或执行环绕通知产生异常后执行
- 环绕通知 aroundThrowing:在动态代理中,可以取代当前被拦截对象的方法,通过参数或反射调用被拦截对象的方法
- 引入 Introduction:在现有的类里添加自定义的类和方法
- 切点 Pointcut:被切面拦截的方法(被代理对象的方法)就是一个切点,切面可以将切点和被拦截方法按照一定逻辑织入约定流程中
- 连接点 join point:判断条件,由它指定哪些是切点;对于指定的切点,Spring生成代理对象去使用对饮的切面进行拦截
- 织入 Weaving:生成代理对象的过程。代理分为静态和动态。静态代理是在编译class文件时生成的代码逻辑,或通过ClassLoader在类加载时生成的代码逻辑,在应用程序代码运行前就生成了对应的逻辑;Spring使用动态代理,在运行期动态生成代码,使用JDK或CGLIB动态代理技术
1.3 Spring对AOP的支持
AOP并非Spring独有,Spring只是支持AOP而已。Spring只支持方法拦截的AOP。
Spring有4中方式实现AOP:
- ProxyFactoryBean和对应接口
- XML配置
- @AspectJ
- AspectJ注入
常用@AspectJ注解实现,有时附以XML配置。其余方式很少用。
2. @AspectJ注解实现AOP
2.1 选择切点
Spring是方法级别的AOP框架,以某个方法作为切点。即动态代理中拦截哪个方法。
首先创建一个接口:
1
2
3
| public interface RoleService {
public void printRole(Role role);
}
|
接口的实现类:
1
2
3
4
5
6
7
| @Component
public class RoleServiceImpl implements RoleService {
@Override
public void printRole(Role role) {
System.out.println("id:" + role.getId() + ", name: " + role.getName());
}
}
|
如果将这个接口类的printRole方法作为切点,则动态代理时就是要为RoleServiceImpl生成代理对象,拦截printRole方法,产生各种通知。
2.2 创建切面
选好切点后就可以创建切面。对于动态代理,切面如同拦截器。Spring中只要注解@Aspect,IoC容器就认为该类是一个切面。
@Aspect注解需要aspectj/aspectjweaver的jar包。
1
2
3
4
5
6
7
8
9
10
11
12
13
14
15
16
17
18
19
20
21
22
| @Aspect
public class RoleAspect {
@Before("execution(* AOP.RoleServiceImpl.printRole(..))")
public void before() {
System.out.println("before...");
}
@After("execution(* AOP.RoleServiceImpl.printRole(..))")
public void after() {
System.out.println("after...");
}
@AfterReturning("execution(* AOP.RoleServiceImpl.printRole(..))")
public void afterReturning() {
System.out.println("afterReturning...");
}
@AfterThrowing("execution(* AOP.RoleServiceImpl.printRole(..))")
public void afterThrowing() {
System.out.println("afterThrowing...");
}
}
|
另有@Around环绕通知,和@Pointcut()未用到。
@Pointcut:可简化注解
1
2
3
4
5
| @Pointcut("...")
public void func(){}
Before("func()")
public void before(){...}
|
2.3 连接点
判断是否需要拦截某一方法。
切面中的注解 execution(* AOP.RoleServiceImpl(..))
execution:执行该方法时候触发拦截器
*:任意返回类型的方法
AOP.RoleServiceImpl:类的全限定名
printRole:被拦截方法名
(…):任意参数
如此,就确定了要拦截的方法,会按AOP通知的规则将其织入流程。
还有其他诸多指示器:
| AspectJ指示器 |
描述 |
| arg() |
限制方法的参数类型 |
| @args() |
限制方法参数为指定注解标注 |
| execution |
用正则匹配 |
| this() |
匹配AOP代理的Bean,引用为指定类型的类 |
| target |
被代理对象为指定类型 |
| @target() |
被代理对象符合指定的注解类型 |
| within() |
匹配指定包 |
| @within() |
匹配指定类型 |
| @annotation |
匹配带有指定注解的连接点 |
指示器可以组合使用,如execution(* xxx.*.*.func(..)) && within(xxx.aop.*)表示只将xxx.aop下的类的func方法作为切点。
XML配置时,&& || ! 用and or not替代。
2.4 测试
配置Bean,开启AspectJ的自动代理,Spring生成动态代理对象
1
2
3
4
5
6
7
8
9
| @Configuration
@EnableAspectJAutoProxy
@ComponentScan("AOP")
public class AOPConfig {
@Bean
public RoleAspect getRoleAspect() {
return new RoleAspect();
}
}
|
或使用XML配置:
1
2
3
4
5
6
7
8
9
10
11
12
| <?xml version='1.0' encoding='UTF-8' ?>
<beans xmlns="http://www.springframework.org/schema/beans"
xmlns:xsi="http://www.w3.org/2001/XMLSchema-instance" xmlns:context="http://www.springframework.org/schema/context"
xmlns:aop="http://www.springframework.org/schema/aop"
xsi:schemaLocation="http://www.springframework.org/schema/beans http://www.springframework.org/schema/beans/spring-beans-4.0.xsd
http://www.springframework.org/schema/context http://www.springframework.org/schema/context/spring-context-4.0.xsd
http://www.springframework.org/schema/aop
http://www.springframework.org/schema/aop/spring-aop-4.0.xsd">
<aop:aspectj-autoproxy />
<bean id="roleAspect" class="com.ssm.chapter11.aop.aspect.RoleAspect" />
<bean id="roleService" class="com.ssm.chapter11.aop.service.impl.RoleServiceImpl" />
</beans>
|
测试:
1
2
3
4
5
6
7
8
9
10
11
12
13
| public class Test {
public static void main(String[] args) {
ApplicationContext context = new AnnotationConfigApplicationContext(AOPConfig.class);
RoleService roleService = (RoleService) context.getBean("roleServiceImpl");
System.out.println(roleService.getClass());
Role role = new Role(1, "jsy");
roleService.printRole(role);
System.out.println("___________");
role = null;
roleService.printRole(role);
}
}
|
1
2
3
4
5
6
7
8
9
10
| class com.sun.proxy.$Proxy22
before...
id:1, name: jsy
afterReturning...
after...
___________
before...
afterThrowing...
after...
Exception in thread "main" java.lang.NullPointerException
|
2.5 环绕通知
同时实现前置和后置通知,保留了调度被代理对象原有方法的功能。可控性不强,仅用于大量改变业务逻辑时。
在切面中加入:
1
2
3
4
5
6
7
8
9
10
| @Around("execution(* AOP.RoleServiceImpl.printRole(..))")
public void around(ProceedingJoinPoint jp) {
System.out.println("around before...");
try {
jp.proceed();
} catch (Throwable throwable) {
throwable.printStackTrace();
}
System.out.println("around after...");
}
|
ProceedingJoinPoint,Spring提供,用于反射切点方法。
此时测试:具体顺序或与Spring版本或配置方式有关
1
2
3
4
5
6
7
| class com.sun.proxy.$Proxy23
around before...
before...
id:1, name: jsy
afterReturning...
after...
around after...
|
2.6 织入
是生成代理对象的过程(内含被代理对象、拦截器的代理对象,运行结果就像是将通知方法织入被代理对象)。上述代码中,切点方法所在类都是拥有接口的类;若没有接口也可使用CGLIB完成动态代理。故Spring规定:类存在接口使用JDK动态代理,织入各个通知;没有接口就是用CGLIB完成动态代理。
动态代理对象是由IoC容器生成的,一般不需修改。Spring建议使用接口+实现类的编程方式,使定义和实现分离,有利于实现变化和替换。
2.7 给通知传递参数
如切点是:
1
2
3
| public void printRole(Role role, int age) {
System.out.println("id:" + role.getId() + ", name: " + role.getName() + "age: " + age);
}
|
通知:
1
2
3
4
| @Before("execution(* AOP.RoleServiceImpl.printRole(..)) && args(role, age)")
public void before(Role role, int age) {
System.out.println("before...");
}
|
即在连接点中加入args属性,并在通知中加入同名参数。
2.8 引入
有时希望引入一些其他类的方法,加入通知流程中。
原理是给代理对象增加可挂载接口,即可通过强转在不同类之间转换,执行不同方法。
本例中,加入一个verify方法判断Role不为null时才输出信息:
先创建RoleVerify接口和实例化对象:
1
2
3
4
5
6
7
8
9
| public interface RoleVerify {
public boolean verify (Role role);
}
public class RoleVerifyImpl implements RoleVerify{
@Override
public boolean verify(Role role) {
return role != null;
}
}
|
并在Aspect中加入Verify属性:
1
2
| @DeclareParents(value = "AOP.RoleServiceImpl+", defaultImpl = RoleVerifyImpl.class)
public RoleVerify roleVerify;
|
@DeclareParents注解:
- value:XXX+,表示对某个类增强,为其引入一个新接口
- defaultImpl:XXX.class,新接口的默认实现类
测试使用:
1
2
3
4
5
6
7
8
9
10
| ApplicationContext context = new AnnotationConfigApplicationContext(AOPConfig.class);
RoleService roleService = context.getBean(RoleService.class);
RoleVerify roleVerify = (RoleVerify) roleService;
Role role = new Role(1, "jsy");
if (roleVerify.verify(role)) {
roleService.printRole(role, 23);
}
|
这里将roleService强转为RoleVerify类型,进而使用verify方法,且是通过RoleVerifyImpl实现的。
原理:
生成代理对象的代码:
1
2
3
4
| return Proxy.newProxyInstance(
obj.getClass().getClassLoader(),
obj.getClass().getInterfaces(),
this);
|
obj.getClass().getInterfaces() 表示代理对象挂在多个接口下,只要AOP让代理对象挂在两接口下,就可以强转Bean,增强了Bean的功能。
若没有接口,使用CGLIB,使用Enhancer雷猴的interfaces属性,代表挂载代理对象接口。
3. XML配置Spring AOP
| AOP配置元素 |
用途 |
| aop:config |
顶层元素 |
| aop:advisor |
定义AOP的通知器,古老方式 |
| aop:aspect |
定义切面 |
| aop:before |
定义前置通知 |
| aop:after |
定义后置通知 |
| aop:around |
定义环绕方式 |
| aop:after-returning |
定义返回通知 |
| aop:after-throwing |
定义异常通知 |
| aop:declare-parents |
给通知引入新接口,增强功能 |
| aop:pointcut |
定义切点 |
本例中仍使用上例的RoleService接口和RoleServiceImpl类,但不需@Component注解。
随后定义切面类:同样无需注解,稍后统一XML配置
1
2
3
4
5
6
7
8
9
10
11
12
13
14
| public class XmlAspect {
public void before() {
System.out.println("before...");
}
public void after() {
System.out.println("after...");
}
public void afterThrowing() {
System.out.println("afterThrowing...");
}
public void afterReturning() {
System.out.println("afterReturning...");
}
}
|
使用XML配置AOP时需要在顶层beans中引入XML定义AOP的命名空间
http://www.springframework.org/schema/aop http://www.springframework.org/schema/aop/spring-aop-4.0.xsd
3.1 定义通知
1
2
3
4
5
6
7
8
9
10
11
12
13
| <bean id="xmlAspect" class="AOP.XmlAspect"/>
<bean id="roleService" class="AOP.RoleServiceImpl1"/>
<aop:config>
<aop:aspect ref="xmlAspect">
<aop:before method="before" pointcut="execution(* AOP.RoleServiceImpl.printRole(..))"/>
<aop:after method="after" pointcut="execution(* AOP.RoleServiceImpl.printRole(..))"/>
<aop:after-throwing method="afterThrowing" pointcut="execution(* AOP.RoleServiceImpl.printRole(..))"/>
<aop:after-returning method="afterReturning" pointcut="execution(* AOP.RoleServiceImpl.printRole(..))"/>
<aop:around method="around" pointcut-ref="printRole"/>
</aop:aspect>
</aop:config>
|
或定义切点减少冗余:
1
2
3
|
<aop:pointcut id="printRole" expression="execution(* AOP.RoleServiceImpl.printRole(..))"/>
<aop:before method="before" pointcut-ref="printRole"/>
|
测试时使用Application ctx = new ClassPathXmlApplicationContext("xxx.xml")获取IoC容器。
3.2 给通知传递参数
通知方法加入形参,随后在XML中的连接点中加入args()属性,此处用and连接,因为&在XML中有特殊含义。
1
| <aop:pointcut id="printRole" expression="execution(* AOP.RoleServiceImpl.printRole(..)) and args(role, age)"/>
|
3.3 引入
在RoleServiceImpl(被代理类 ?,注解引用时是加入切面类中)中加入RoleVerify属性 public RoleVerify roleVerify = null;
随后XML配置:aop:aspect下
1
2
3
4
| <aop:declare-parents
types-matching="xxx.RoleServiceImpl+"
implement-interface="xxx.RoleVerify"
default-impl="xxx.RoleVerifierImpl" />
|
4. 早期Spring AOP实现
暂不展开,《JavaEE互联网轻量级框架整合开发 SSM框架和Redis实现》11.5
5. 多个切面
多个切面时,默认随机执行,可通过以下操作指定顺序。
新建接口与实现类(切点):
1
2
3
4
5
6
7
8
9
10
11
| public interface MultiBean {
public void testMulti();
}
@Component
public class MultiBeanImpl implements MultiBean{
@Override
public void testMulti() {
System.out.println("test multi aspects.");
}
}
|
新建多个切面:此处仅写出一个
1
2
3
4
5
6
7
8
9
10
11
12
13
14
15
16
17
18
19
20
21
22
23
24
| public class Aspect1 {
@Pointcut("execution(* AOP.MultiBeanImpl.testMulti(..))")
public void print(){};
@Before("print()")
public void before() {
System.out.println("before 1...");
}
@After("print()")
public void after() {
System.out.println("after 1...");
}
@AfterThrowing("print()")
public void afterThrowing() {
System.out.println("afterThrowing 1...");
}
@AfterReturning("print()")
public void afterReturning() {
System.out.println("afterReturning 1...");
}
}
|
Config类设置与Test类测试:
1
2
3
4
5
6
7
8
9
10
11
12
13
14
15
16
17
18
| @Configuration
@EnableAspectJAutoProxy
@ComponentScan("AOP")
public class MultiConfig {
@Bean
public Aspect1 getAspect1() {
return new Aspect1();
}
@Bean
public Aspect2 getAspect2() {
return new Aspect2();
}
}
ApplicationContext context = new AnnotationConfigApplicationContext(MultiConfig.class);
MultiBean multiBean = (MultiBean) context.getBean("multiBeanImpl");
multiBean.testMulti();
|
但是结果一直是同一个顺序啊 迷幻
如要指定顺序,在注解AOP中,可以使用@Order:在Aspect1中加入@Order(1),在Aspect2中加入@Order(2)…
还有其他方法:如Aspect实现Ordered接口,实现getOrder方法,返回自己的次序;XML中则<aop:aspect ref="aspect1" order="1">
指定顺序后,则按照以下顺序执行:
1
2
3
4
5
6
7
| before 1...
before 2...
test multi aspects.
afterReturning 2...
after 2...
afterReturning 1...
after 1...
|
类似设计模式中的责任链模式。即Spring底层通过责任链模式处理多个切面。